Blog

Five Things You Should Never Do with Passwords
Passwords are the bane of our modern existence. Nearly anything you want to do calls for a password. As the Internet’s reach extends beyond computers and into phones, TVs, appliances, and even toys, we have to enter passwords with increasing frequency and in ever more annoying ways. Remembering and recalling all those different passwords can be frustrating in the best of circumstances and impossible in the worst.
To make dealing with passwords easier and more secure, everyone should use a password manager like 1Password or LastPass. Such apps generate random long passwords like kD*SSDcCl7^6FN*F, store those passwords securely, and automatically enter them for you when you need to log in to a Web site. They are essential in today’s world.
You’ll still need a few passwords you can remember and type manually—for instance, the master password for your password manager and your Apple ID password. Make sure those passwords are at least 12 characters, and we recommend going to at least 16 characters.
If you’re unsure of the best way to create a strong password, try taking the first letter of each word in a sentence you can remember, and also change a few words to digits. Then “Now is the time for all good men to come to the aid of the party!†becomes a password along the lines of Nitt4agm2c2ta0tp!. So that no eavesdroppers learn your password, avoid saying your sentence out loud whenever you enter it! Or, combine four or five unrelated dictionary words, like correct-horse-battery-staple, that add up to at least 28 characters. (Don’t use the examples in this paragraph!)
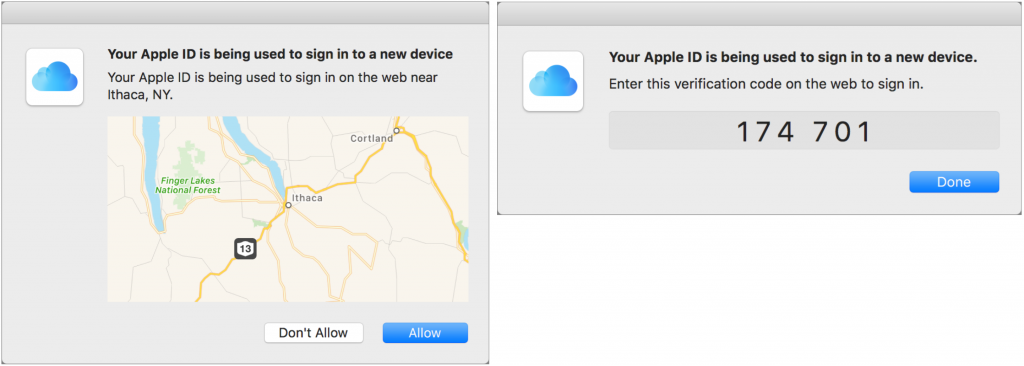
When possible, take advantage of two-factor authentication on sites like Apple, Google, Dropbox, Facebook, Twitter, and more. Accounts protected by two-factor authentication essentially require that you enter a second, time-expiring password as part of the login process. You’ll get that second password via text message, authenticator app, or other notification method when you log in.
But what we really want to talk about today is what you should not do with passwords. Follow these tips to avoid making mistakes that can undermine even the security provided by a password manager.
- Don’t use the same password twice. This is key, because if the bad guys get your password—no matter how strong—for one site, they’ll try it on other sites.
- Don’t share passwords with anyone you don’t trust completely. That’s especially true of passwords to accounts that contain sensitive information or that can be used to impersonate you, like email and social media. However, sometimes you have to share a password, such as to a club blog with multiple authors. In that case…
- Don’t send passwords to shared sites via email or text message. If someone hacks into your recipient’s email or steals their phone, the password could be compromised. Instead, use a site like One-Time Secret to share a link that shows the password only once, after which the recipient should put the password into their password manager.
- Don’t write your passwords on sticky notes. Yeah, it’s a cliché, but people still do it. Similarly, don’t put all your passwords in a text file on your computer. That’s what password managers are for—if someone steals your computer, they can’t break into your password manager, whereas they could open that text file easily.
- Don’t change passwords regularly if you don’t have to. As long as every site has a strong, unique password, changing a password is a waste of time, especially if doing so makes you write down the password or communicate it insecurely. If you do have to update a password regularly, a password manager makes the task much easier.
We realize that it’s tempting to take the easy road and share a password with a friend via email or write a particularly gnarly one on a sticky note. But today’s easy road leads directly to identity theft and is paved with insecure password habits. You might think no one would pay attention to little old you, but times have changed, and organized crime is interested in any Internet account that can be cracked.

Getting Calendar Events in the Right Place
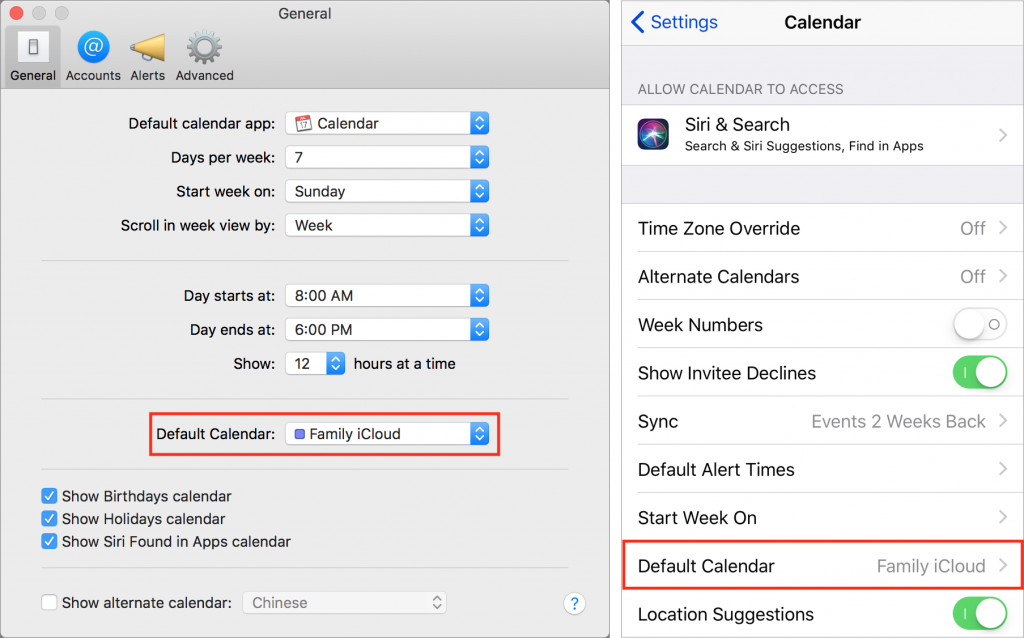
Apple’s Calendar apps in both macOS and iOS let you manage multiple calendars, some of which may be private and others may be shared with family or colleagues. That’s great, but if you create a new event on the wrong calendar, you may end up oversharing with colleagues (who don’t need to know about your colonoscopy) or undersharing with your spouse (who does need to know about the soccer carpool). To reduce the chances of this happening, set the most appropriate calendar as your default. In macOS, you do this in the Calendar app, in Calendar > Preferences > General > Default Calendar. In iOS, set it in Settings > Calendar > Default Calendar.
iPhone Cleaning 101
All iPhones pick up fingerprints, and it’s all too easy to get your iPhone dirty with ink, lotion, makeup, dirt, food, and oil. If you’re faced with an iPhone that needs cleaning, resist the urge to spray it with window cleaner, rubbing alcohol, or ammonia, or, even worse, to scrub it with baking soda or Borax. That’s because all iPhones have oleophobic—oil repellent—coatings on their glass surfaces that make it easy to wipe off fingerprints. You don’t want to remove that coating any faster than it will wear off normally, and cleaning products will strip it quickly. Instead, Apple recommends a soft, lint-free cloth such as you would use for glasses or camera lenses. By the way, even though the iPhone 7 and later have some level of dust and water resistance, it’s important to avoid getting moisture in the openings—most of the time, a lens cloth should be all you need.

Phishing Attacks: What to look for in your email messages
One of the most important things you can do to stay safe on the Internet is to be careful while reading email. That’s because online criminals know that we’re all busy, and we often don’t pay enough attention to what we’re reading or where we’re clicking.
To take advantage of our inattention, these Internet information thieves forge email messages to look like they come from the likes of Apple, Facebook, and Amazon, along with well-known banks, payment services, retailers, and even government agencies. We’ve received calls from several clients over the past few months who have received very realistic looking phishing emails. Even more dangerous are messages that appear to come from a trusted individual and include personal details—these messages are often targeted at executives and company managers. Generally speaking, these attacks are called phishing—you can see examples here.
The goal? Get you to click a link in the message and visit a malicious Web site. That site usually continues to masquerade as being run by a company or organization you trust. Its aim is to sucker you into revealing confidential information by asking you to log in, pay for a product or service, or fill out a survey. The site—or an attachment in the email message—might also try to install malware. Although macOS is quite secure, if you approve security prompts, it can still be infected.
Although phishing is a huge problem that costs businesses hundreds of millions of dollars every year, you can easily identify phishing messages by looking for telltale signs:
- Be suspicious of email messages, particularly from people you don’t know or from well-known companies, that ask you to click a link and do something with an online account.
- Look closely at email addresses and URLs (hover the pointer over a link to see the underlying URL). Phishing messages don’t use official domains, so instead of paypal.com, the addresses and links might use paypa1.com—close enough to pass a quick glance, but clearly a fake.
- Watch out for highly emotional or urgent requests. They’re designed to make you act without thinking. Take any such messages with a grain of salt.
- Channel your inner English teacher and look for poor grammar or odd phrasing, which are red flags for phishing messages. Email from real companies may not be perfect, but it won’t have multiple egregious errors.
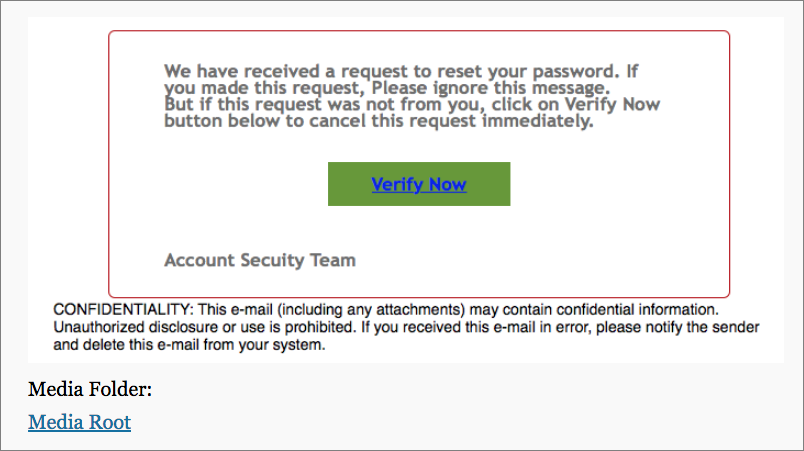
So what do you do if you get a message that may be phishing for sensitive information? Most of the time you can just ignore it. If you’re worried that it might be legit, instead of clicking any links in the message, navigate to the site in question manually by typing the organization’s URL into your browser—use a URL that you know to be correct, not the one in the email message. Whatever you do, do not open attachments that you aren’t expecting and never send confidential information via email.
If you think you’ve fallen prey to a phishing attack and given away a password, you’ll want to change passwords on any affected accounts. If you’ve opened any attachments or approved any installs, run anti-malware software to determine whether your Mac has been infected. Contact us if you need help. And remember, regular backups protect you from a multitude of sins.
Apple Pay Cash now available
Apple Pay Cash is Apple’s new person-to-person payment service, designed to make it easy for individuals to send and receive money. It’s perfect for repaying a friend who buys concert tickets or a relative who picks up some groceries for you. Or rather, it’s perfect if your friends and relatives use iPhones with iOS 11.2 or later—for green-bubble Android acquaintances, Apple Pay Cash won’t work. Here’s how to start using Apple Pay Cash.
First, if you haven’t yet enabled Apple Pay, go to Settings > Wallet & Apple Pay > Add Credit or Debit Card, and follow the prompts to add at least a debit card. You’ll also need two-factor authentication turned on in Settings > Your Name > Password & Security—regardless of Apple Pay, two-factor authentication is essential for security. With Apple Pay enabled, tap Settings > Wallet & Apple Pay > Apple Pay Cash and run through the setup process. You might also be asked to verify your identity after setup—it’s necessary to send or receive more than $500 in total.
When you’re done, you’ll end up with a new Apple Pay Cash card in the Wallet app. It’s a virtual card that stores money you receive and works like any other debit card for payments. If it doesn’t have enough money on it to cover a payment, you can choose any other debit or credit card you’ve added to Apple Pay. You can also add money to it or withdraw money to a linked bank account. You’ll want to use a debit card when adding money or paying beyond your balance with Apple Pay Cash, since then there is no transaction fee. A credit card incurs a 3% fee.
To send or request money via Apple Pay Cash, you use its Messages app, which is installed automatically. While in an iMessage thread (blue bubbles) with the person with whom you want to exchange money, make sure the app drawer is showing (tap the app button if necessary) and then tap the Apple Pay button in the drawer.
A panel appears with a dollar amount, + and – buttons, and buttons for Request and Pay. Use the + and – buttons to set the amount, or tap the dollar amount to show a keypad where you can enter an exact amount, with cents if necessary. Then tap Request or Pay to insert the transaction into the message. It won’t be sent until you tap the black send button, so if you change your mind, you can tap the little x to delete. Lastly, you’ll be prompted to verify the transaction in the usual Apple Pay fashion, which means authenticating with Face ID on the iPhone X or Touch ID on all other iPhones.
You can even use Siri to initiate transfers—“Send my mother $15.†or “Ask my sister for $4.99.†And if you have an Apple Watch with watchOS 4.2 or later, you can also send money from the Messages app, or send or request money via Siri. On the watch, double-press the side button to confirm the transaction.
Frankly, the only downside to Apple Pay Cash is that it works only within the Apple world. But as long as you want to exchange money with Apple-using friends and relatives, it’s fast, easy, reliable, and one less reason to visit the ATM.
Last Minute Gift Ideas from MacAtoZ

At MacAtoZ we’re always on the lookout for a good purchase or a fun new gadget. Â If you’re looking for Apple related stocking stuffers or gift ideas, here are a few recommendations:
- A two pack of 3′ Anker Lightning cables for ~$20. These cables have reinforced stress points, a double-braided nylon exterior, and a toughened fiber core (among other things), making them much stronger than Apple’s rather flimsy Lightning cables.
- A 2-port Anker 24W USB charger for iPhone or iPad for ~$12. This the fastest iPhone/iPad charger we’ve found, and the build quality is as good or better than Apple’s own chargers.
- We love the Moko case for our iPads. It protects well, it offers 50, 70, and 100 degree viewing angles, and it’s substantially less expensive than Apple’s cases and covers. Here’s a few cases—make sure you pick the one that’s right for the model of iPad you have: iPad 2017 9.7″, iPad Pro 10.5″, iPad Air 2, and iPad Pro 12.9″.
We receive a small commission on any of the products you purchase through the above links. If you’re shopping at Amazon.com you can always gift us with a small commission by using our referral link: www.macatoz.com/amazon. Your prices stay the same and you help us so that we can help you.
Happy Holidays from MacAtoZ!

You Can Print Labels for Your Holiday Cards with Apple’s Contacts App
If mailing your holiday cards (see our previous post) is made harder by having to write addresses on envelopes, you can skip the handwriting step this year with mailing labels. Although many people don’t realize this, it’s easy to print mailing labels on standard label stock using the Contacts app on the Mac. You can even add a personal touch by including a graphic and using a custom color and font choice. Here’s what you need to do:
- In Contacts, choose File > New Group to create an empty group into which you can collect your card recipients. Name the group something like Holiday Cards.
- Click All Contacts to see your full collection of contacts, and then drag your recipients from the center column to the Holiday Cards group. Note that you have to click and hold briefly before Contacts lets you start dragging a contact; if you drag too soon, Contacts assumes you want to select more contacts. You can drag contacts one at a time or select several at once and drag the entire selection. This doesn’t move contacts out of All Contacts—you’re just adding them to the Holiday Cards group, which functions much like an iTunes playlist.
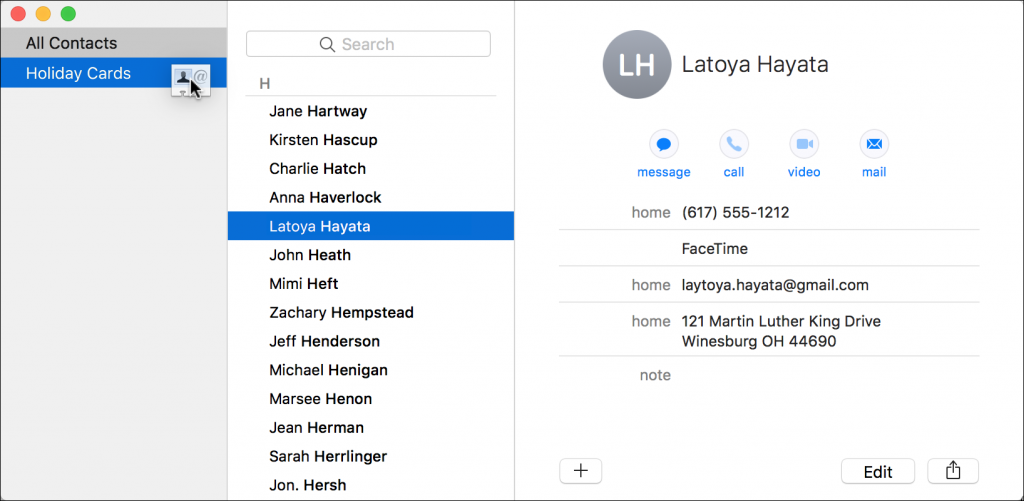
- Once the Holiday Cards group is populated with all your recipients, click its name in the sidebar, and then choose File > Print to open the Print dialog.
- To set up your cards, you need to see details in the Print dialog, so at the bottom of the Print dialog, click the Show Details button (if it’s already called Hide Details, you’re all set). You also need to see the special controls for Contacts, so make sure Contacts is chosen from the pop-up menu underneath the page range fields. Then from the Style pop-up menu, choose Mailing Labels.
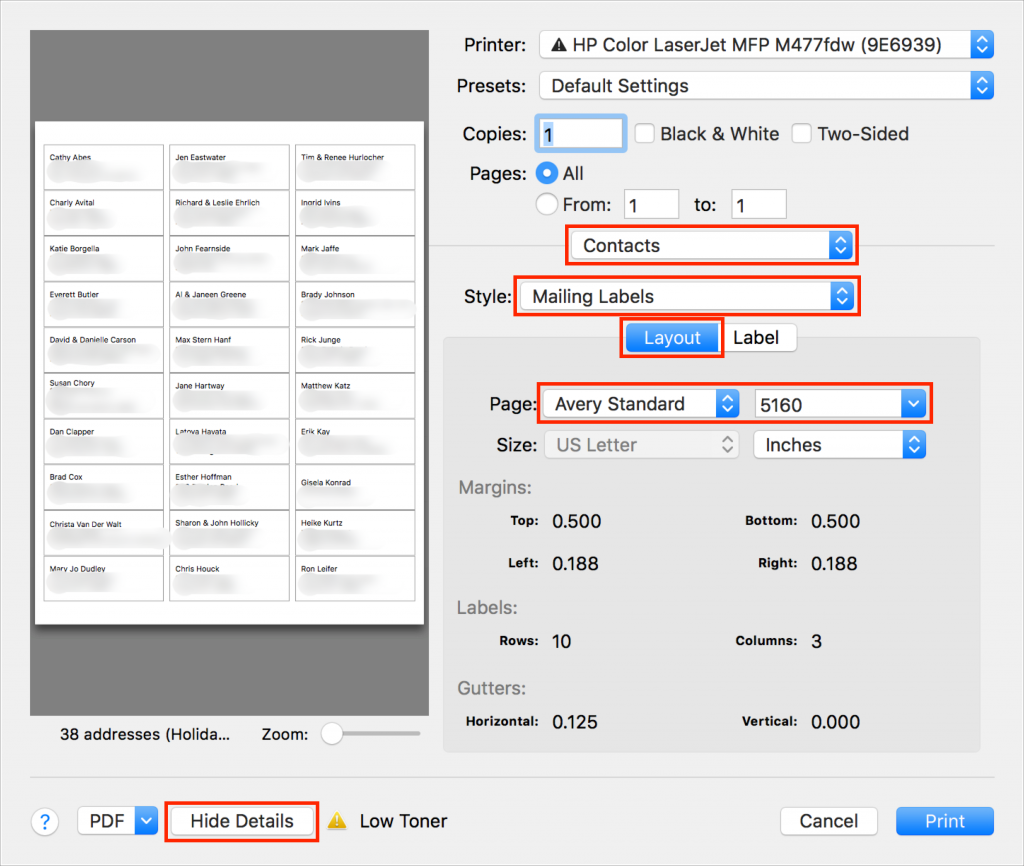
- Beneath the Style pop-up menu, make sure Layout is selected, and then in the Layout view, from the Page pop-up menus, choose the manufacturer of your labels and the number associated with the labels. (Avery 5160 is the most common label type and is readily available at office supply stores and online.)
- Click Label to switch to the Label view. From the Addresses pop-up menu, choose the type of address you’re using. Home is likely the most appropriate; if you choose All, Contacts will print both Home and Work addresses if available. You can also choose to print company and country here, and if you print country, you can exclude your own country, which makes it easy to include overseas friends and relatives without printing the country for most people.
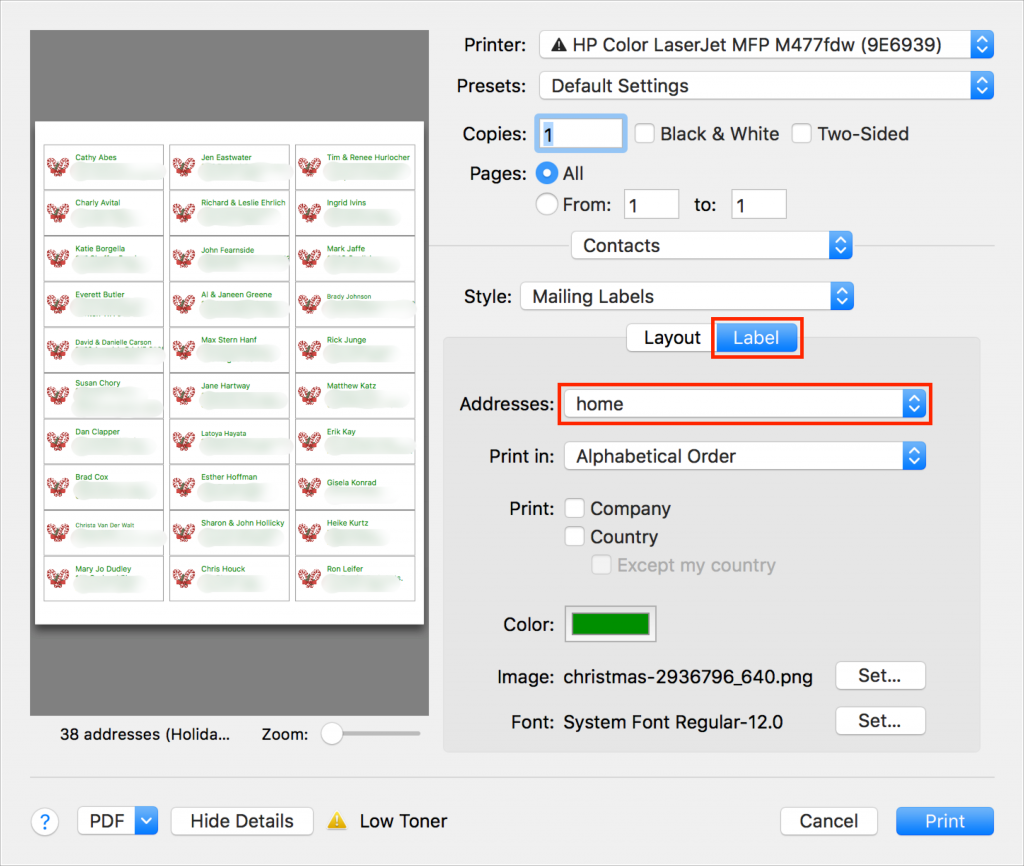
- Although the defaults are fine, if you want, you can change the color of the label text, select a small image to print next to each contact, and change the font.
- It’s time to print, but not on your label stock just yet! Click the Print button to print a draft of your labels on plain paper. You’ll use this draft for two things—checking the addresses for accuracy and verifying that the labels will print properly on the label stock.
To check if the labels will print correctly, stack a page from the draft on top of a sheet of blank labels, and then hold them up to a bright light or sunlit window. You should be able to see whether the positioning is right—it should be in most cases. If not, make sure you’ve chosen the right label in the Print dialog, and if all else fails, create a custom label with your own margins and gutters to make it work. - Once you’ve fixed addresses for everyone who has moved recently and verified your positioning, you can print for real on your label stock.
That’s it! Most of the work comes in selecting people, making sure their addresses are right, and updating those that have changed—actually printing labels takes only a few minutes. As you stick your labels on envelopes, you can revel in the knowledge that it will go even faster next year!
We help people with Apple technology.

